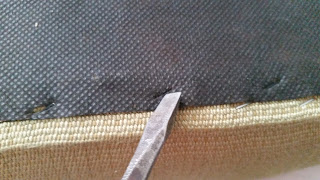
Tutorial: Repairing the dust cover on your furniture or box spring bed.
Then today's tutorial is for you! This is a pretty easy repair to perform on your furniture, and the materials you will be using are inexpensive. All you need are the supplies, time and patience. Let's begin.
What you will need:
staple gun and staples
scissors
flat head screwdriver
Sharpie or similar permanent marker
needle nosed pliers
material for the dust cover- you can use the internet and get yourself Cambric Uphol Fabric, or you can use black landscaping fabric, which gardeners use to line their flower bed (and protect plants from weeds) if you have a local supplier at post. .
As you can see from the photo above, this ottoman's dust cover has met with an unfortunate fate. In this shot I have already removed two of the legs from the ottoman. This particular Drexel piece has legs that screw off (see photo below), so if you have this Drexel, and need to repair the dust cover, know that it is very easy to take the legs off. Other Drexel pieces might require a little more work (and tools) so keep that in mind before starting on your project and plan accordingly.
For the next step, you will need your flat head screwdriver and needle-nose pliers. You are going to remove all the staples holding down the edges of the dust cover. These staples are going to be darker than the staples holding the upholstery down- they will be black. This is going to sound dumb and unnecessary, but I am going to say it anyway. Only remove the staples holding the dust cover to the bottom of the furniture. DO NOT REMOVE THE STAPLES HOLDING THE UPHOLSTERY TO THE FRAME! Leave them alone. If you remove these staples you will damage the upholstery. These staples (unlike the staples holding down the dust cover) will be silver. You will not see these staples until you remove the dust cover, so just leave them where they are and move on.
 |
| Small black staples! |
 |
| Ottoman sans dust cover |
If you find that you are having a hard time getting the staples out (like I did with this ottoman), you can also attempt to pull off the ruined dust cover, which will leave the staples behind. These staples won't be seen once you put the new dust cover on, but you will need to make sure you don't staple in the same place they are when you begin stapling. Also, you will likely be removing the Drexel tag attached to the bottom of your furniture, if one is present. This tag will be stapled back onto the frame (in this example, on the side) where you found it in the first place.
The next step is to cut your fabric. Get your fabric and drape it over the piece. Be generous- let the fabric drape over the sides when possible (may be less when the width of your fabric off the roll is equal to or less than the width of the furniture). This will ensure you have enough fabric to make a folded over, professional looking edge around the bottom of the furniture where the cover ends and the visible upholstery begins.
Once you have draped your fabric, take your scissors and poke a hole through the fabric where your furniture legs screw in. Once you have finished, make the holes in the fabric neater. You are doing this so the hardware (in this example, the legs) does not pull on or tug at the dust cover and possible warp the fabric when reattached. If you have something like the ottoman that is laying flat on the ground, you can put the legs back on after.
 |
| These legs made it easier to expand the initial hole so I could trim it to the right size. |
 |
| What it should look like after cutting to hardware opening. |
 |
| Fold! |
After you trim the fabric, you are going to take the excess hanging over the edge and fold it under, so that the new edge covers the upholstery staples and stops short of the edge. At this stage you are going to want to put one staple at the center of each side. While this fabric isn't really thick, or in need of serious stretching (as you would do when stretching your own canvas), you still need to do it so the tension on the fabric as you staple the edge is even and you avoid any rippling/folds in the 'stretched' fabric.
 |
| Folded edge |
 |
| Fabric ready for stapling! |
 |
| Stapled corner! |
 |
| Stapled and re-tagged! |
 |
| From silver to black! |
 |
| All done! |
 |
| Time for the next ottoman! |


